News
50th Anniversary - Old School Pencils, Pens & Airbrushes
As Design Mart celebrates 50 years, we’re bringing you a look at how presentation drawings were created in the past...long before CAD systems and Photoshop. Last time we gave you a look at how Design Mart founder, Joe Fernandez, created rock pitch, polish, and frost finishes with specially tuned airbrushes. In this installment we’ll show you how some of the details were created to simulate a light source, highlights and shadows, and a mirror-like polish.
Roses & Leaves
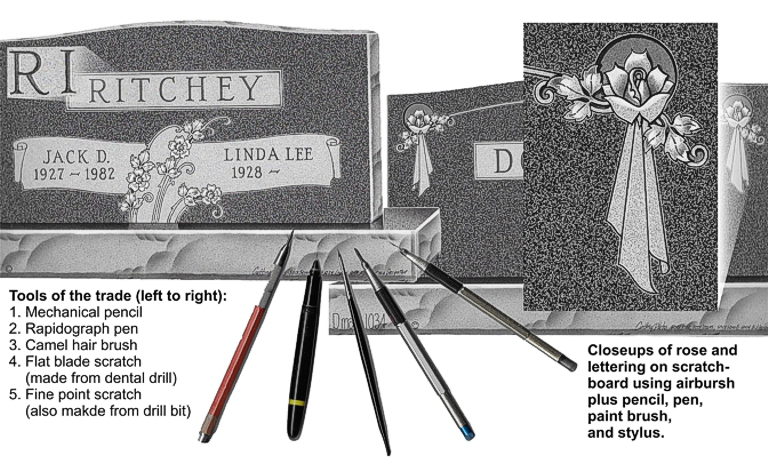
In the enlarged carving shown on the top right of this image it is easy to see how the entire carving was frosted by airbrush. After that, sunken portions of a carving were given some additional ink from the same airbrush. When the ink dried, highlights were scratched onto the high points of the leaves and petals by lightly dragging a broad-blade stylus with microscopic teeth notched into it. Both the fine point stylus and the broad stylus were handmade from dental drill bits.
In the circle around the rose bloom, you’ll see that the shadow is heavier at the top left. That’s where the light source is located on every airbrushed Dmart design. A line is scratched around the entire carving to simulate the light reflected by the edge of the polish on each v-line. After zooming out, the highlights are almost imperceptible, but it’s one of the small things that makes Dmart presentations special.
Panels
Like carving, lettering, and all other aspects of a drawing, panels were first drawn by pencil on tracing paper using a triangle and T-square. After drawings were created and refined on tracing paper, a pencil was rubbed on the back of the tracing allowing a carbon paper-like transfer of the design to scratch board.
Inking was the first thing to be done on the scratch board. Panels and other lines drawn with logarithmic and French curves were drawn with a fine pen while smaller, tighter curves and letters were inked with a very fine camel hair brush.
Letters
Letters were transferred from the original drawing onto scratch board and a fine camel hair brush was used to create a light gray letter. Ink was diluted with water to match the shade of gray on all other Dmart designs. After the light gray wash dried, a darker gray was applied on the left side of every part of the letters to create a V-like appearance with the light source located at the top left. A stylus was used to scratch a highlight on the right side of the letters where light would catch the edge of the frosted surface.
Base Reflections & Highlights
Reflections were always applied to the polished tops of bases to simulate the mirror-like polish. In the design on the left of this image, the carving ends at the joint. This section of the frosted top of the base was masked off while polish was applied. When the mask was removed, the carving appeared to reflect on the polished top of the base.
The right sides of monuments and bases were always airbrushed and scratched to show reflective polish.
You’ll also notice the rock pitch on the right side of the base is slightly darker than the rock pitch on the front of the base, and the rock pitch on the side of the monument is slightly darker than the rock pitch on top of the monument. Like all other aspects of a Dmart design, everything was created with a light source located at the top left.
We hope you enjoyed a glimpse back at how things were done 50 years ago. Please watch for more stories and images related to monument design next month.